Just so we’re clear: Paris is not in the United States, London is not in Hong Kong, and Tokyo is not in Canada. This seems obvious, but go and check the Country and City values of your Salesforce environment and you might see that this is a matter of some confusion.
By default, standard Country and Province/Territory fields accept free-text values. This means these fields can’t be categorized for reporting, they’re hard to validate upon entry, and you can’t query records efficiently. It also means you can’t build any processes for territory assignment, business intelligence, referral generation, forecasting or any other critical processes based on those Country and State values.
Fortunately, we can use the State and Country/Territory Picklists setting to solve this problem by transforming the Country and State/Province fields from free-text into picklists that share a common value set across all standard objects. We’ll spend the first half of this blog showing how to set that up, then we’ll show an example of a custom build on top of this newly organized data set to efficiently map records to custom region values.
Part I – Configuring Picklists and Cleaning Data in Salesforce
The first step is to come up with our list of accepted Country and State values. Salesforce has a default list of 235 countries, 10 of which include States/Provinces. Yes that is 40 more than the 195 countries recognized by the United Nations, but geopolitics is finicky. Anyway, it’s important you don’t just settle for what comes out of the box. You need to accommodate any values which may be inserted into your Salesforce on a new record. The best place to find those values is by exporting the country values used by your marketing platform and setting those values as your baseline. Once you have your list of accepted country values, we can begin configuration.
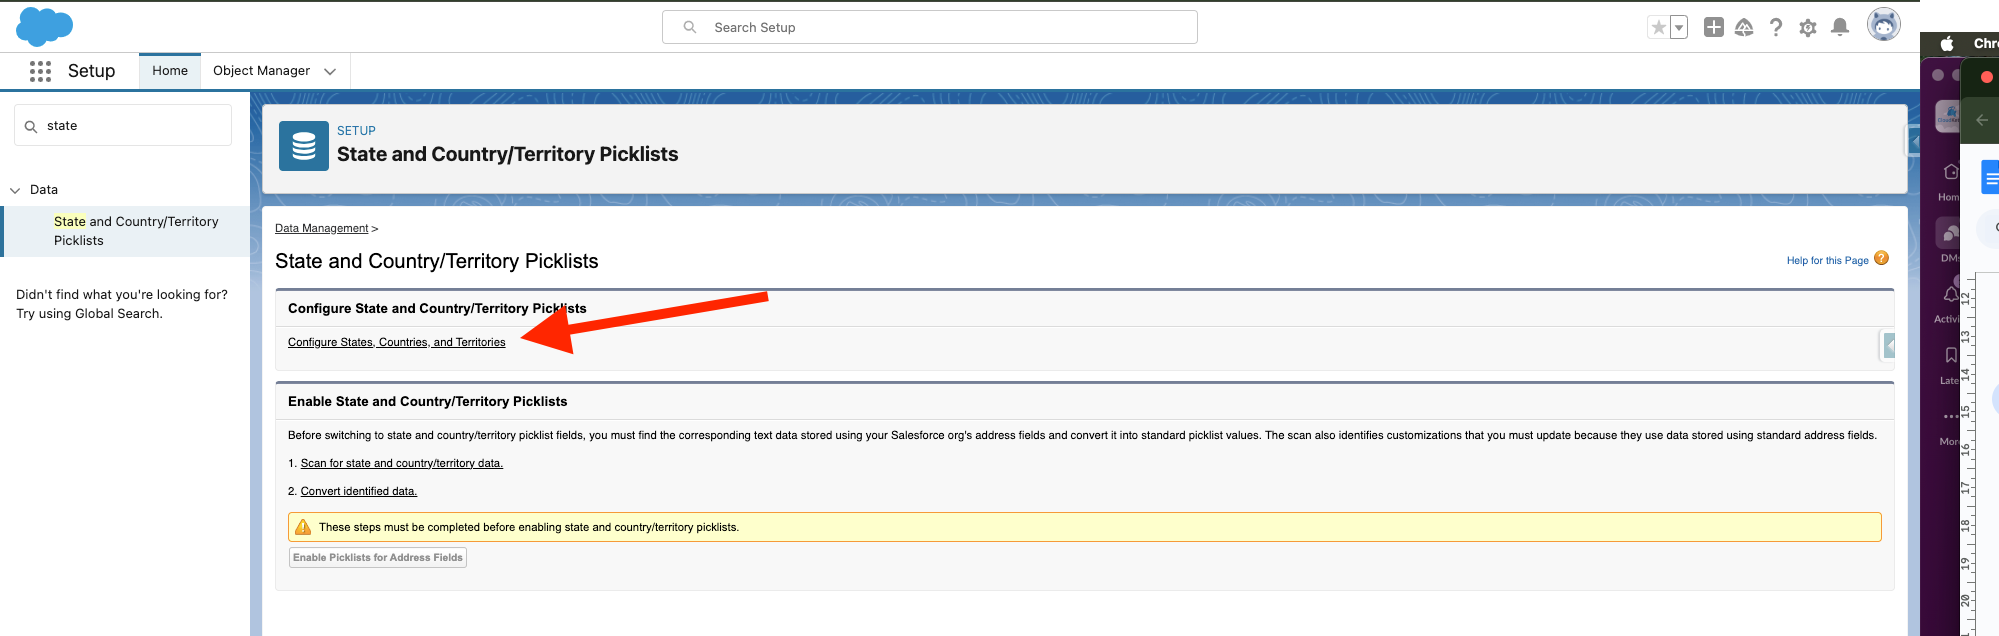
To begin configuring your new address values, you’ll want to go to open Setup in Salesforce, then search for State and Country/Territory Picklists in the Quick Find box. From here, click on the link for Configure States, Countries and Territories.
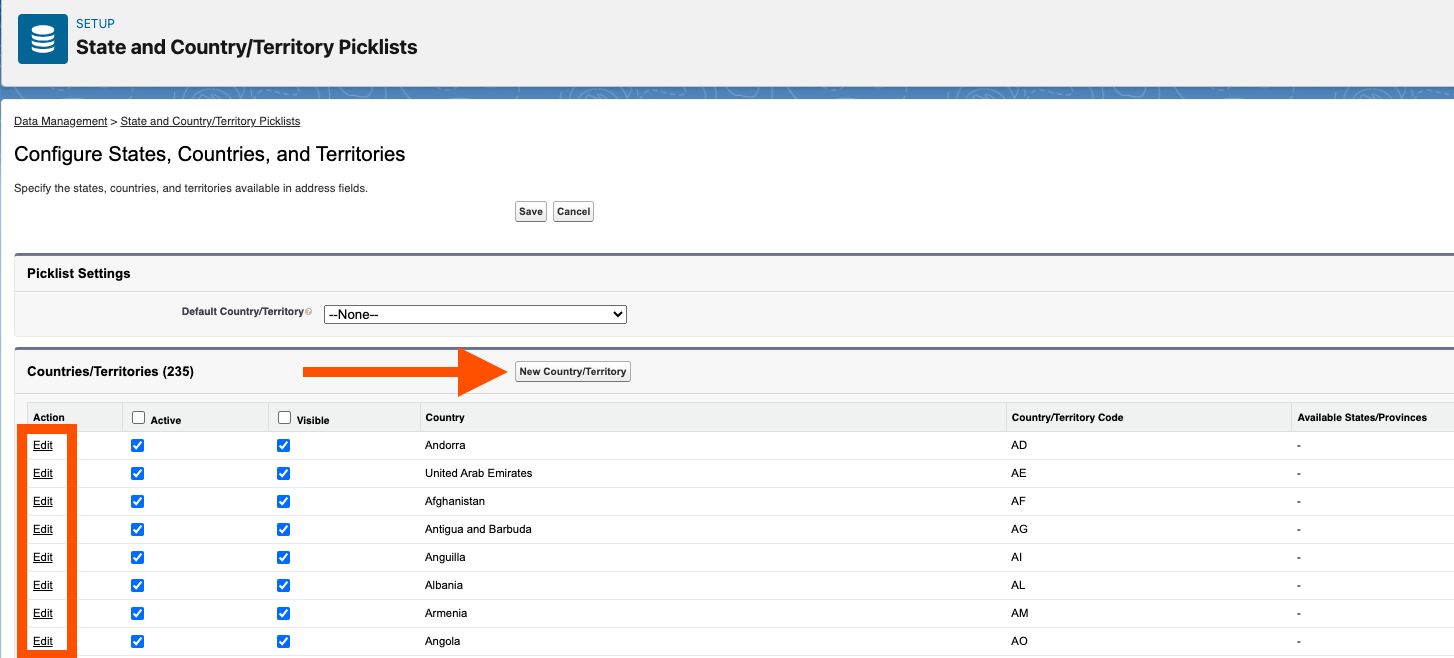
This will bring up a page showing the aforementioned 235 possible Country values Salesforce will accept. From here feel free to deactivate any options you don’t want Salesforce to accept, or hide any options you don’t want to be available for manual selection by using the Active and Visible checkboxes respectively. If you want to add a country you don’t see, hit the New Country/Territory button at the top of the top of the page. If you want to edit the name of a given country, you can hit the Edit link on the left side of that row. Configure the Country values to match the values populated by your marketing forms.
Now that we’ve configured the Country values, let’s look at States/Provinces. State/Province values behave like a dependent picklist based on the Country value – so ‘New York’ will only appear when Country is ‘United States’ for example. Salesforce comes loaded with State/Province values for: Australia, Brazil, Canada, China, Ireland, India, Italy, Japan, Mexico, and the United States.
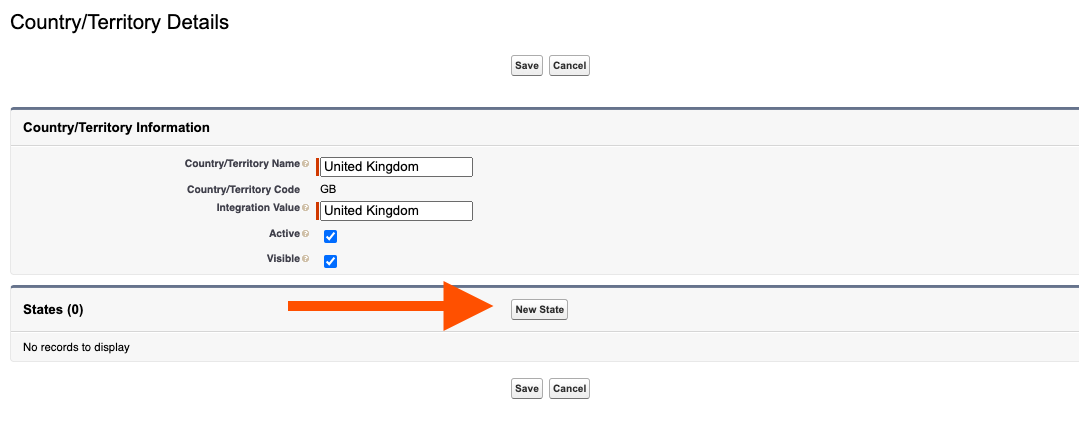
To add or change State/Province values, hit the Edit action next to the Country in question, then hit New State. Fill in the name and code values for the county/state/province in question.
Now we’ve configured the acceptable values for our Country and State fields, we need to query our environment for any records with Country or State values that don’t exactly match these newly defined values. To do that, go back to the State and Country/Territory Picklist page and hit the 1. Scan for state and country/territory data, then hit the button with the same name on the following page. This will run a job across your database for any Case, Lead, Quote, Order, Contract Account, or Contact records which have non-acceptable State/Province or Country values.
Once the job has finished, you’ll receive an email with the results. To update the records go back to the State and Country/Territory Picklist page and hit 2. Convert identified data. From this page you can give instructions for how Salesforce should update the unaccepted values.
In the top section are all of the record values Salesforce isn’t sure what to do with. Select all values that should be mapped to a common Country value, and hit Save to Changelist to move them into the changelist at the bottom of the page.
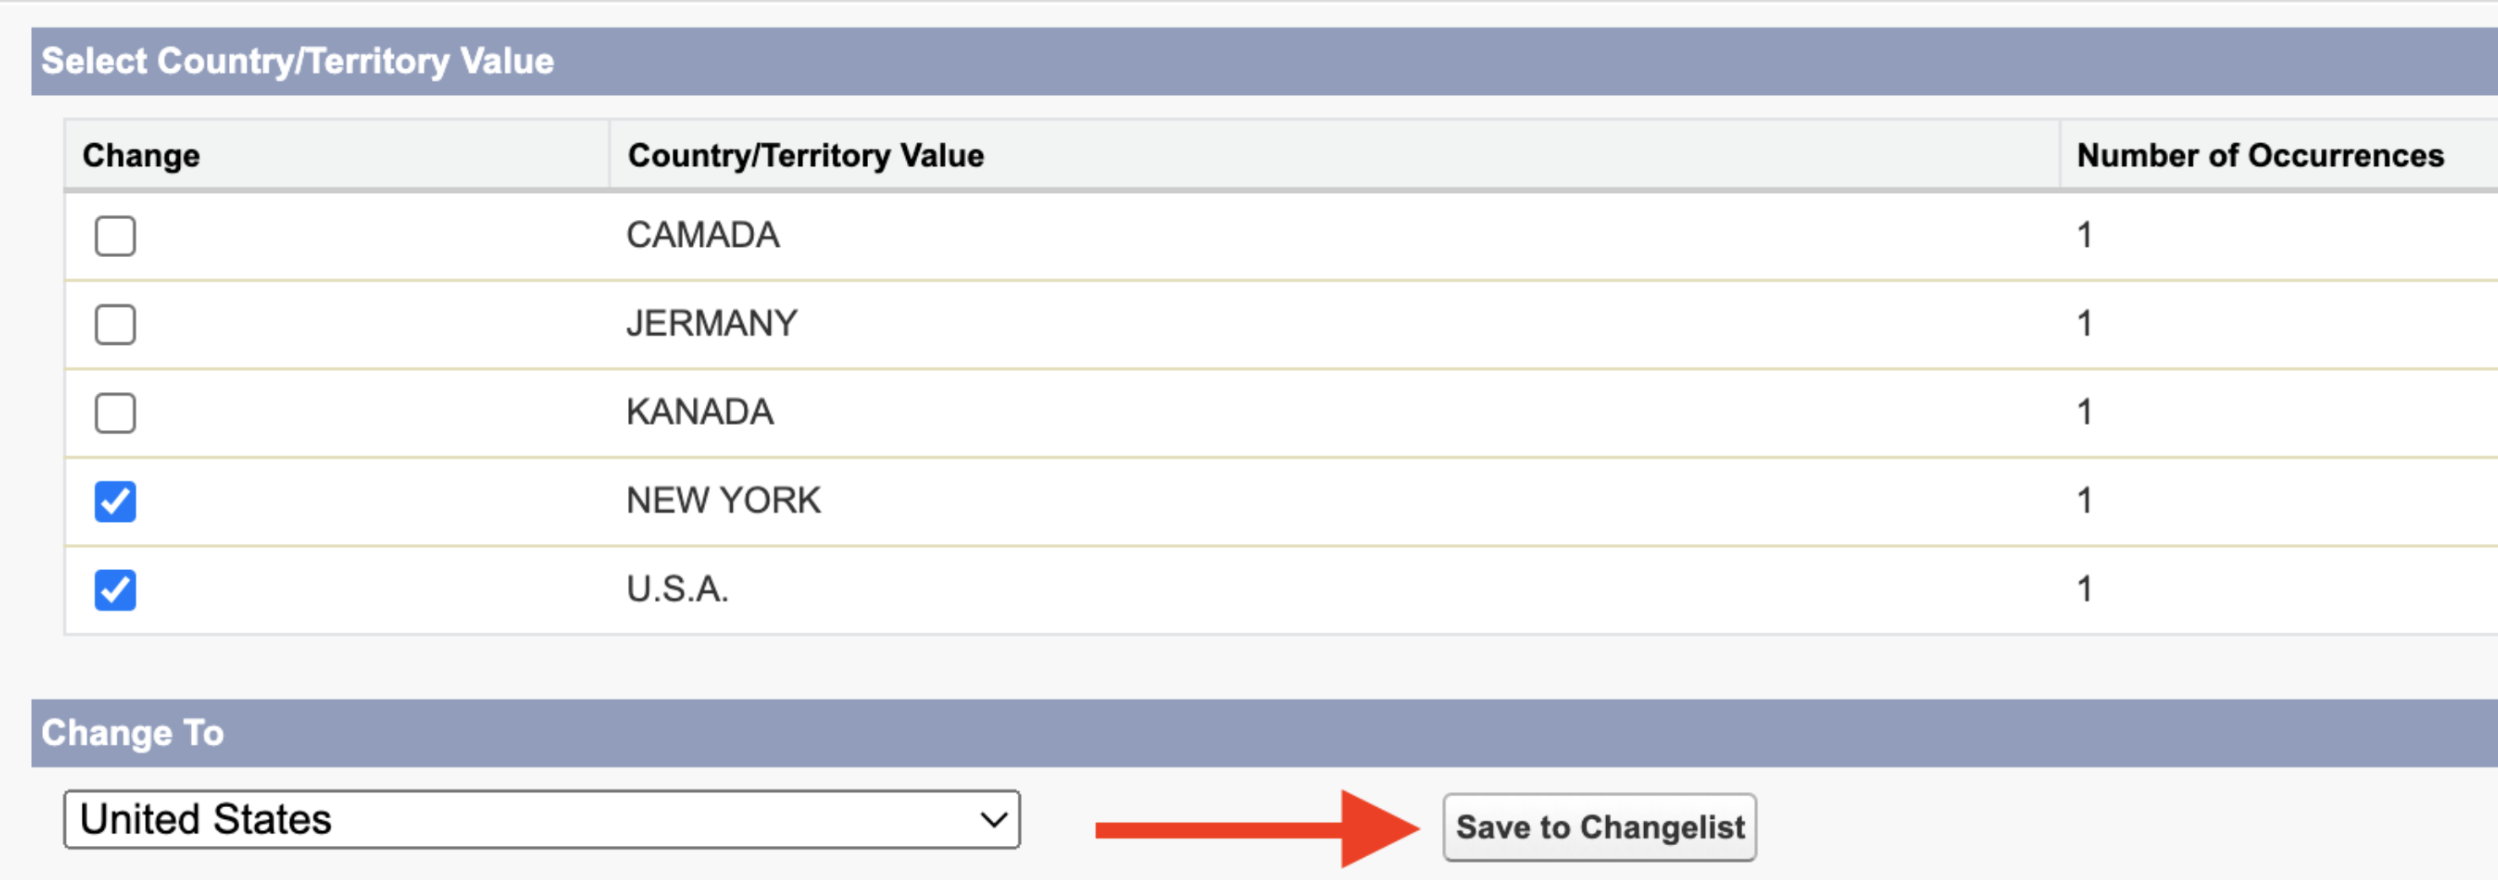
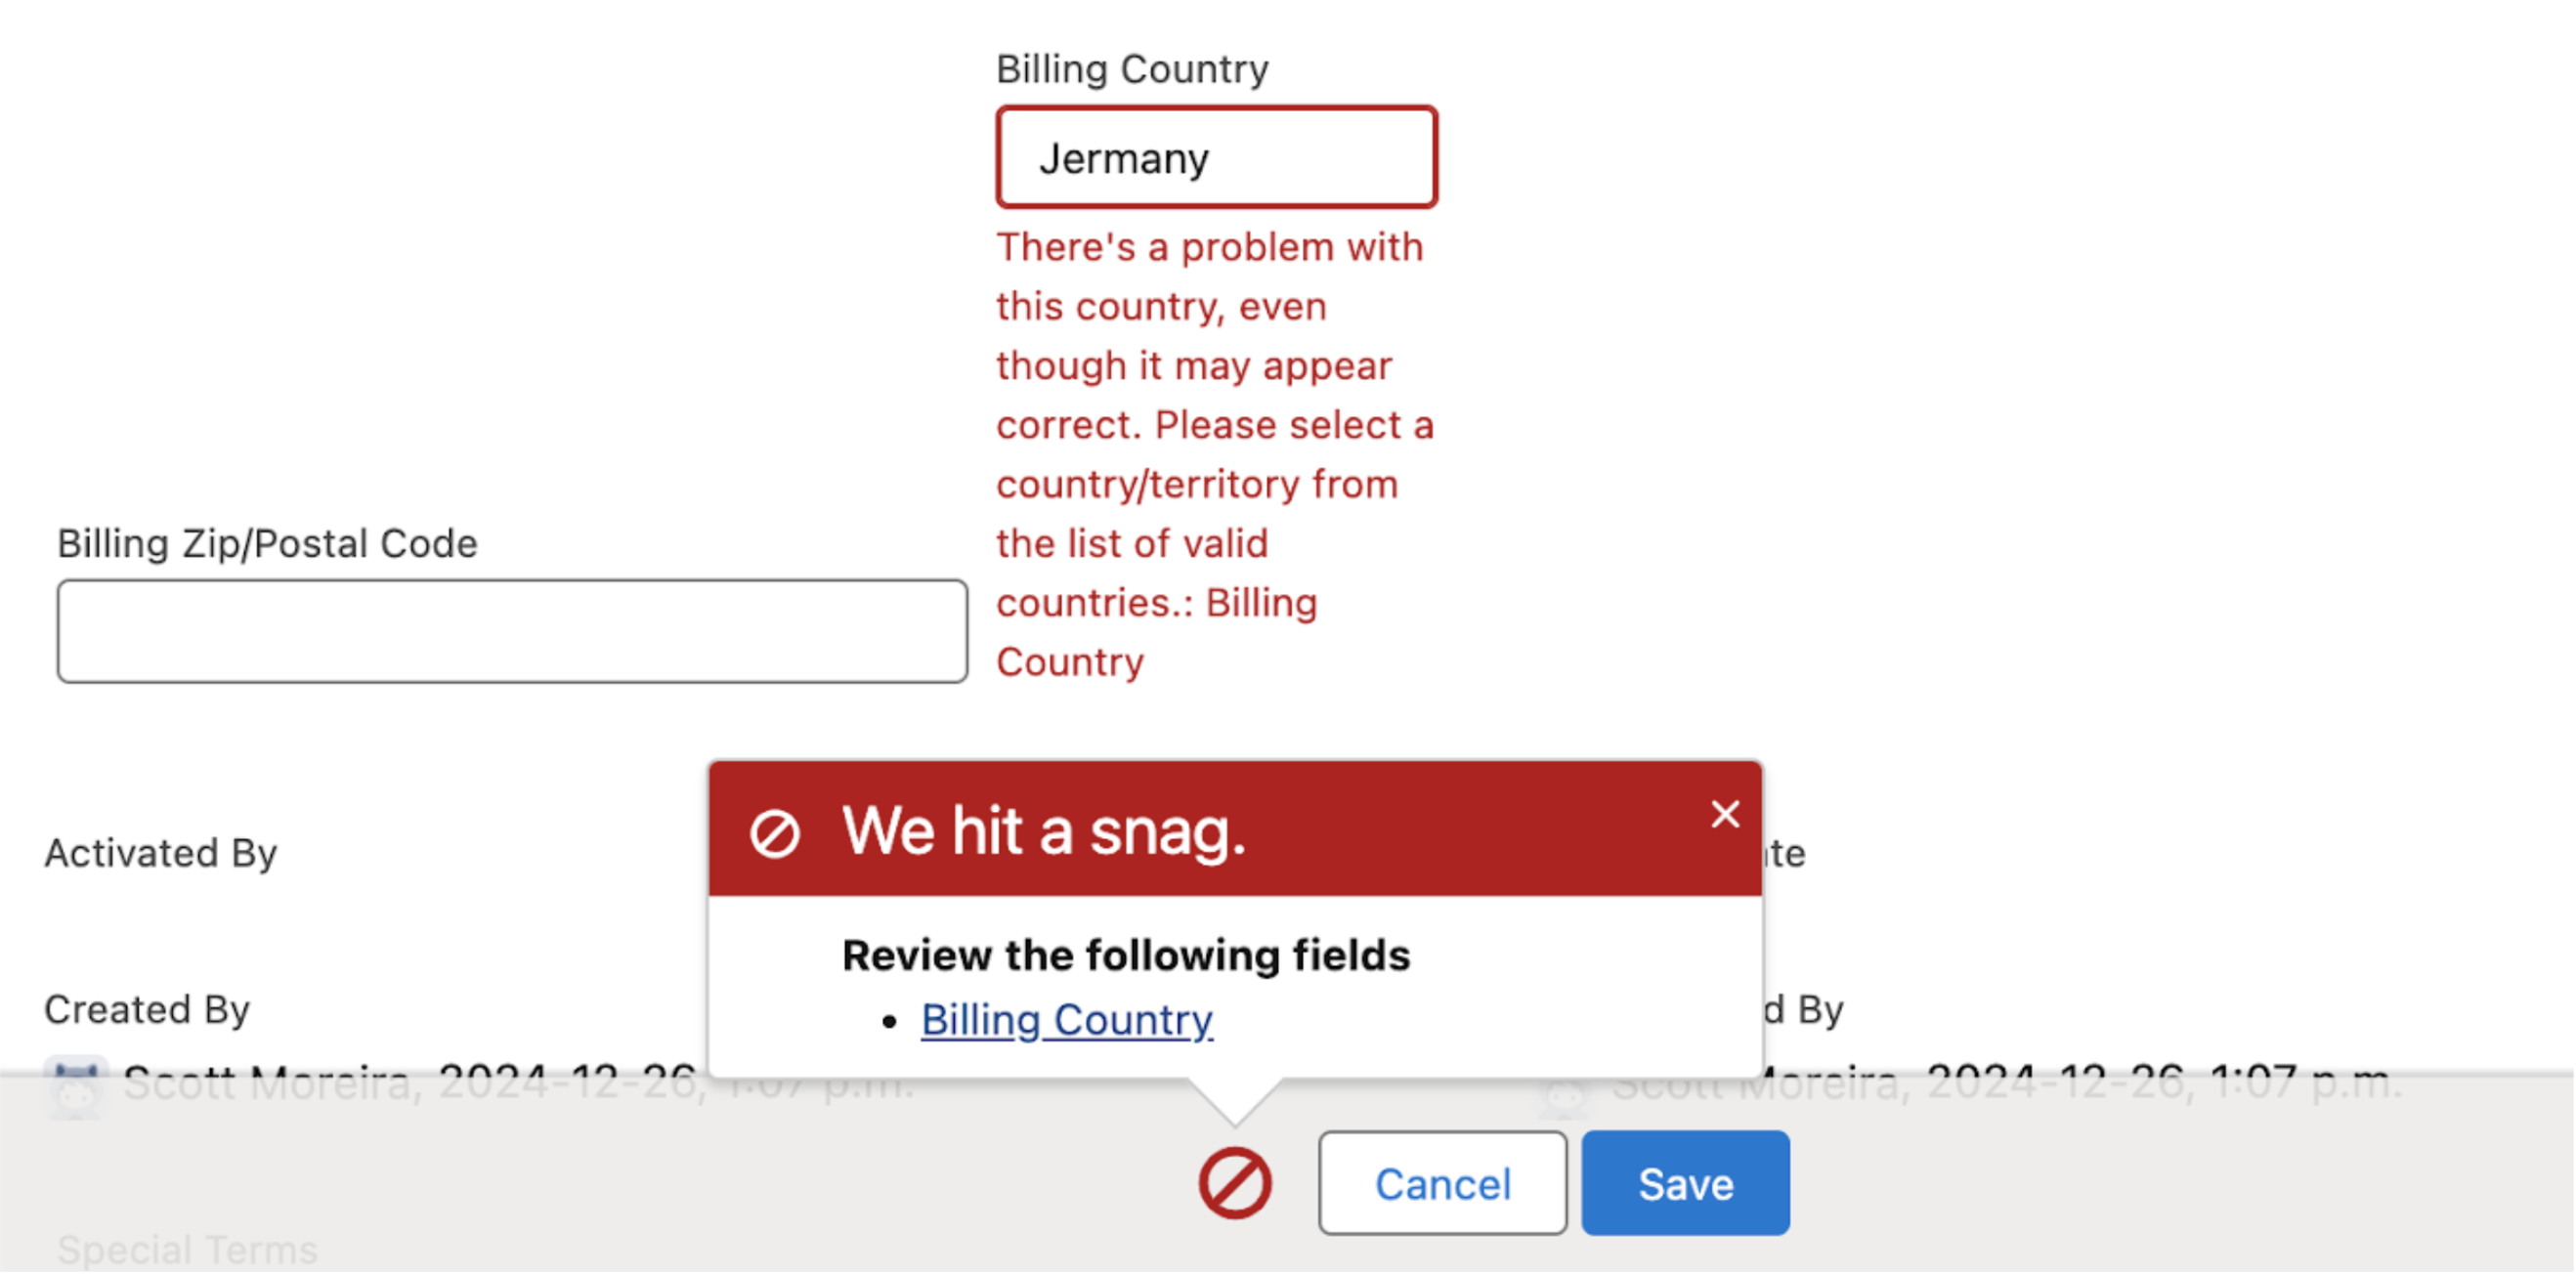
If you’re not sure which country a value should be mapped to, you can choose ‘Unknown value’ from the ‘Change To’ drop down. Any records set to ‘Unknown Value’ will not be updated as part of this job. However, once the fields have been updated to picklists instead of free-text, any record with a value that’s not accepted will throw an error the next time a user attempts to edit the record. An example of the error a user would see is pictured below:
Once you’ve told Salesforce what to do with all the flagged records, you can hit Next to move on to the State/Province values. Repeat the process you followed for reassigning Country values for Province values, then hit Next.
And that’s it! Review your changes, and when you’re ready hit Finish and enable picklists. This will push through the field value changes you mapped in prior steps, and change all Country and State/Province fields from free-text to picklists.
Part II – Custom Build
Now that you can rely on your location values, let’s do a cool little build to put this tidy dataset to use. We’re going to create a solution which will route Lead records to different regions based on their country of origin.
To start, let’s go to Object Manager, then the Lead object, and create a new picklist field called Region. We’ll give Region the values of; “North America”, “Europe & Middle East”, “Latin America”, and “Rest of World”.
Now, if we only care about populating this field on the Lead object, we could just do a simple Flow. However, we want to make sure that Country to Region mapping is the same across any objects we might want to categorize by region in the future. To do that, we’re going to use a feature called Custom Labels.
Custom Labels are ways to store organized values across objects. So in this example we’ll create Custom Labels for each of our four regions, and give those Labels all of the values we want mapped to that region.
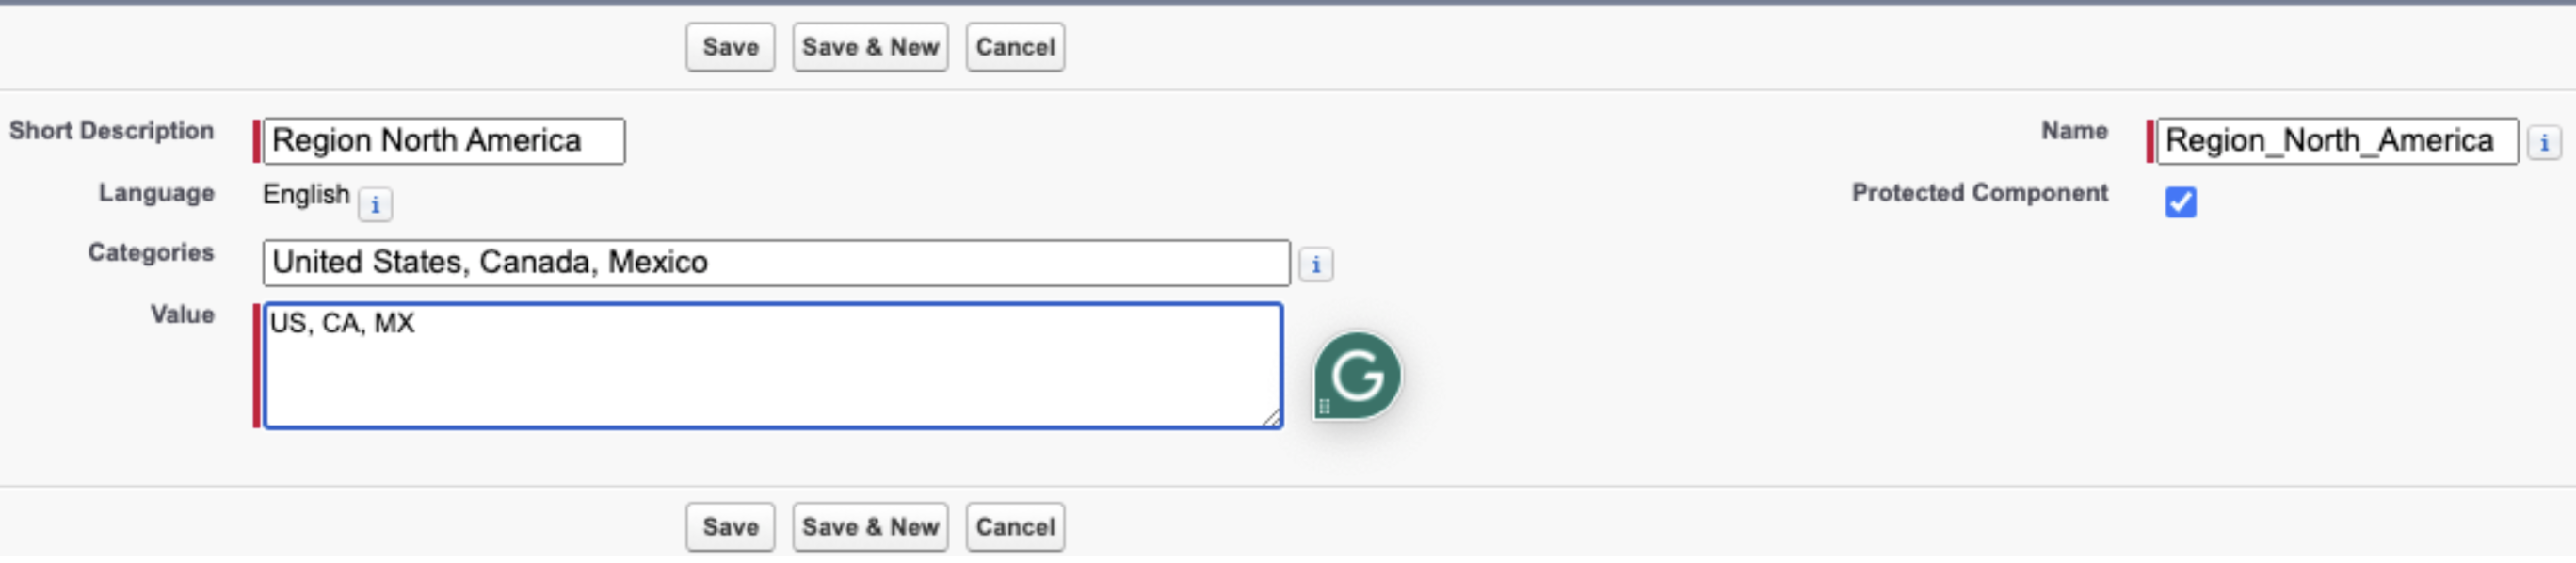
In Setup, search for “Custom Labels” in the Navigation Bar at the top of the screen (not to be confused with the Quick Search bar on the left). Go ahead and hit New Custom Label to get started. Let’s start with our North America Label. In the Short Description and Name field, fill in what this label should be called. I’ll go with “Region North America”. In the Categories field, input the full names of any countries in this territory. For the purposes of this exercise, the Categories values will only be seen by administrators to understand which countries are in this region. Lastly, in the Value field, put in the Country Code of the countries you want to assign to this region, as found in the Configure States, Countries and Territories page from earlier. These are the values that Salesforce is automatically going to search for when a record has its Country Code changed.
Repeat this process for all of your region values. If you run out of space in the Categories field, you can break your regions into multiple Custom Label records, such as “Region Europe & Middle East #1”, “Region Europe & Middle East #2”, etc.

Once you’ve created all the required Custom Labels, we just need a simple Flow to assign a value to the Region__c picklist we created on the Lead object. To do that we’ll go to Flow Builder, hit New Flow, Start From Scratch, Next, Record-Triggered Flow, and Create.
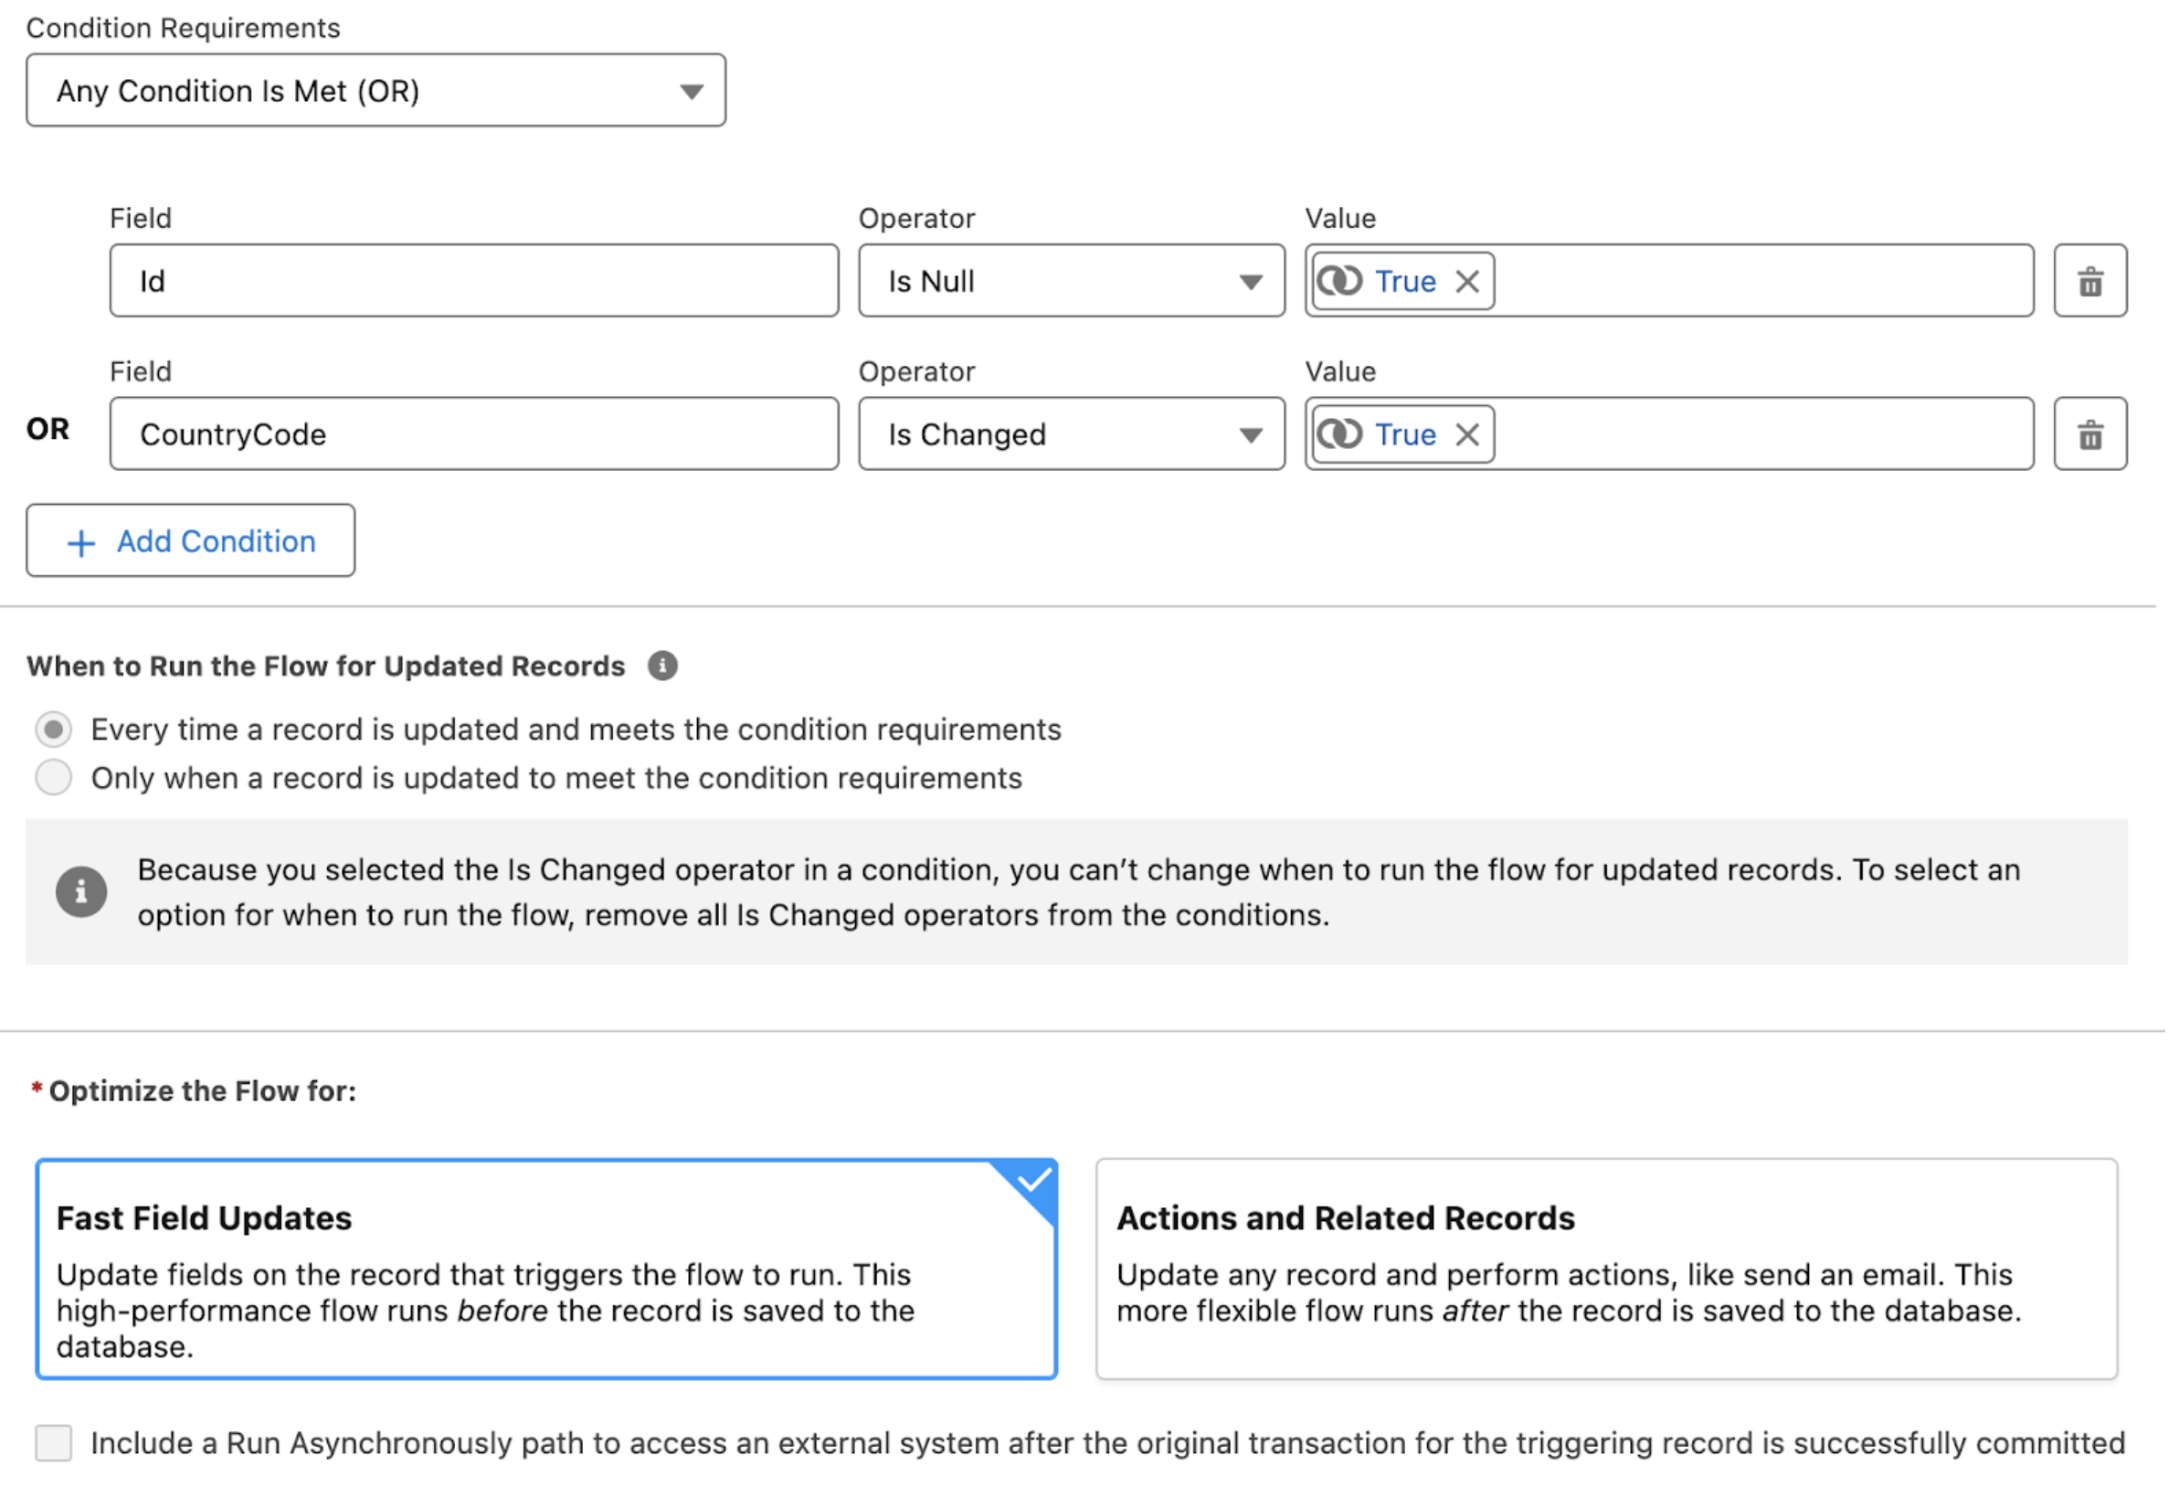
Set the object to Lead, configure the trigger as A record is created or updated, and entry condition requirements as Any Condition is Met (OR). Enter these two conditions:
Field: ID, Operator: Is Null, Value: {!$GlobalConstant.True}
Field: CountryCode, Operator: IsChanged, Value: {!$GlobalConstant.True}
This will set our Flow to trigger whenever a Lead record is created, or when the CountryCode is changed. Choose to run the Flow Every time a record is updated and meets the condition requirements, and optimize the Flow for Fast Field Updates.
NOTE: Be sure to use the CountryCode standard field and not the Country standard field! Since we chose to optimize for Fast Field Updates, this Flow will run based on the values of the record before the save is committed to the database. When the Country picklist is edited, the CountryCode field value is updated first, then the save is committed to the database, then Salesforce updates the Country text value to match the new CountryCode. If we reference the Country value in a before-save Flow, the Flow won’t trigger, or will reference expired values.
Now that we’ve configured the entry criteria and basic settings, add a Decision node to the Flow. We want to add one Outcome for each Region value, and one Resource for each Custom Label we created for that region. Name the Outcome after the region in question, choose Any Condition is Met (OR) for the Condition Requirements, and for the Resources use the Syntax:
Resource: {!$Label.LABEL_NAME}, Operator: Contains, Value: {!$Record.CountryCode}
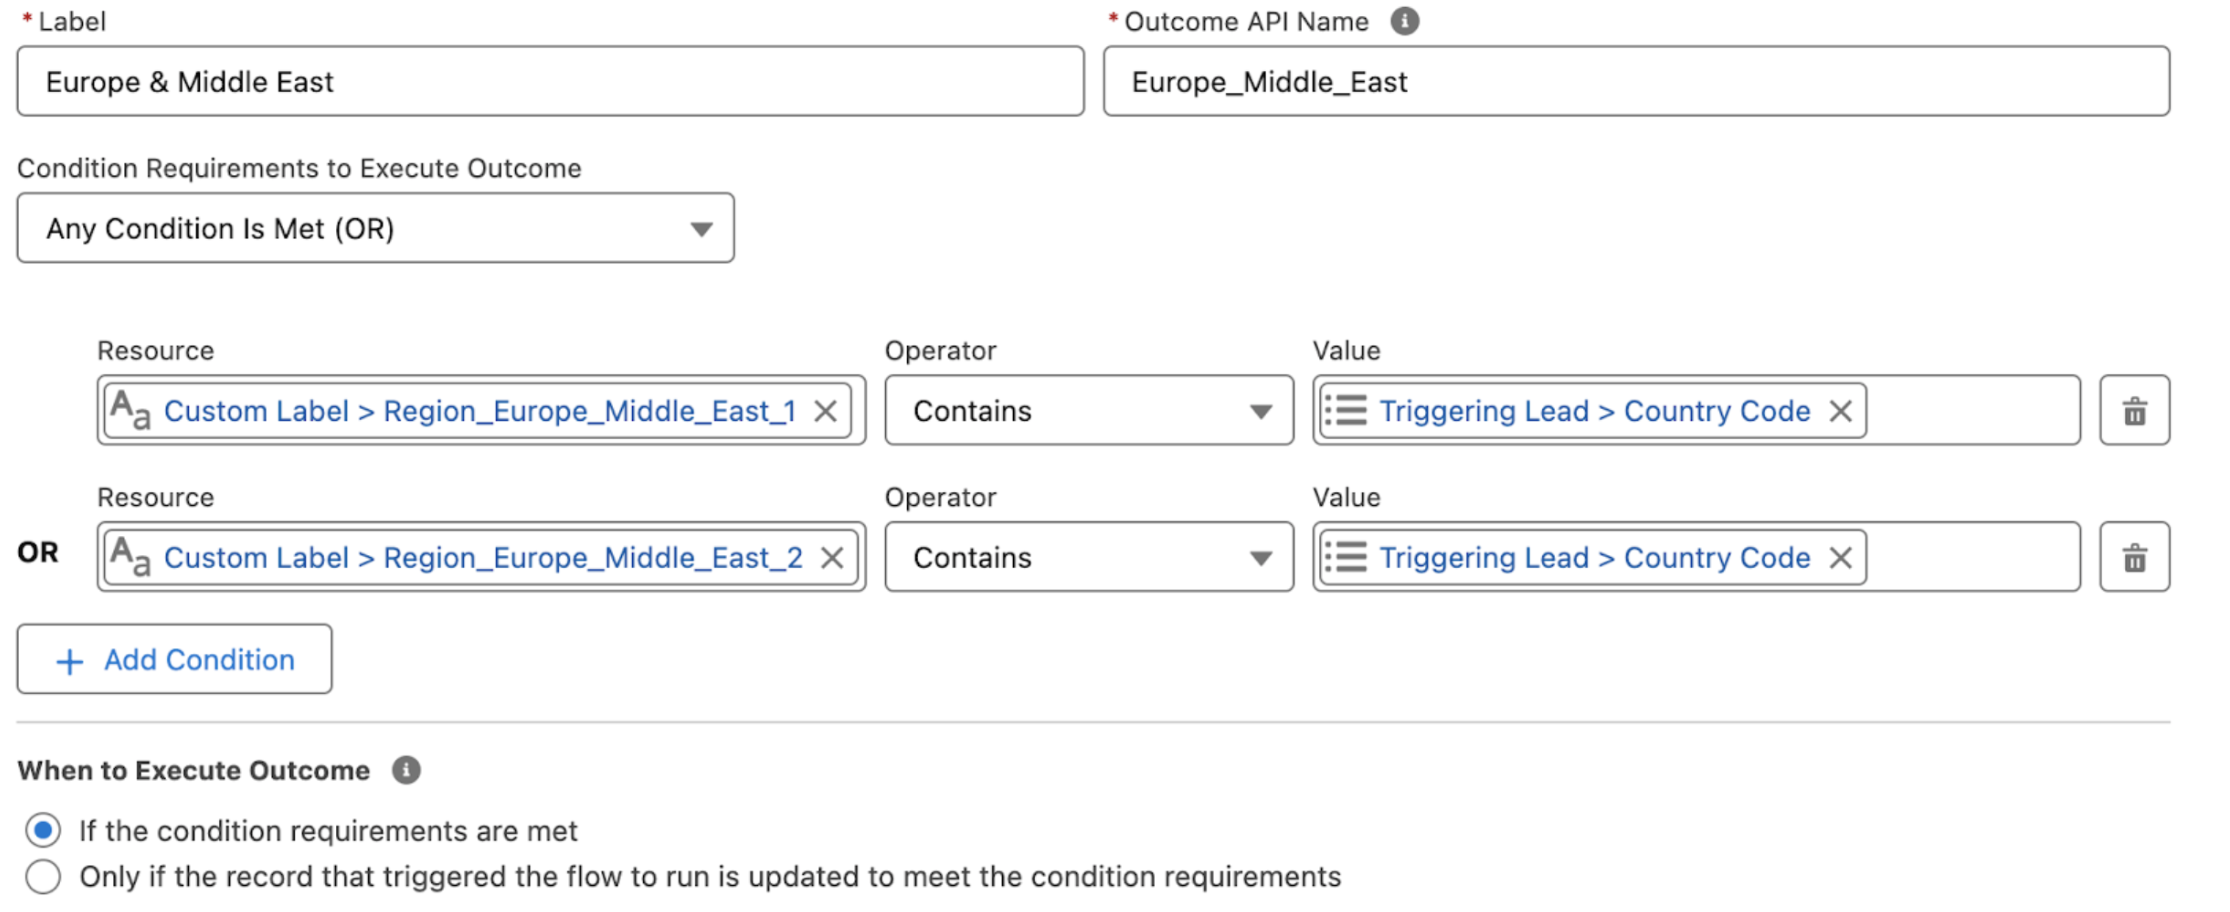
This will tell Salesforce to look through the comma-separated list in the Value field of the Custom Label until it finds the CountryCode of the Lead record.
After that, send each branch of the Decision node to an Assignment node which sets Lead.Region__c to the correct picklist value.
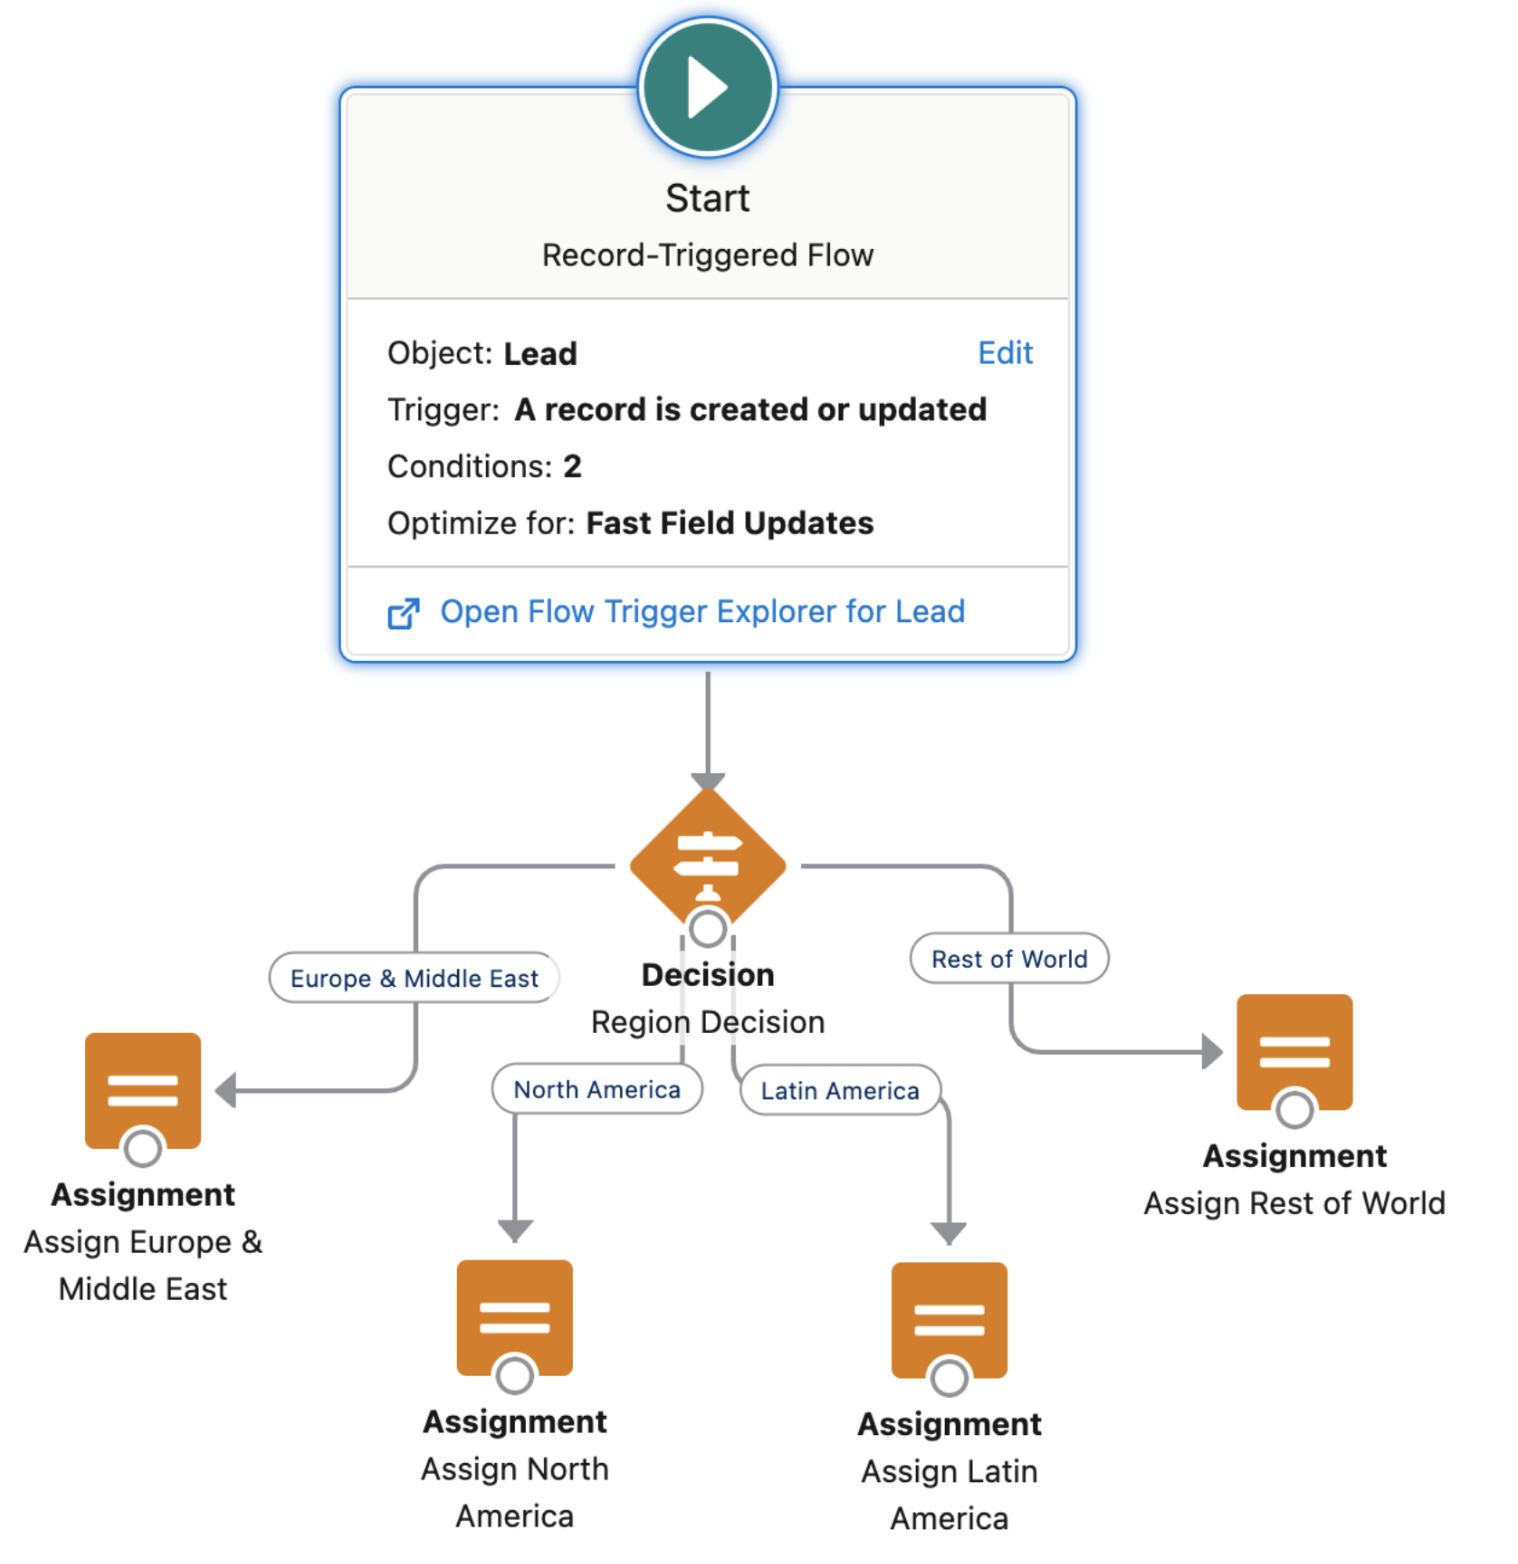
And you’re done! Now, all new or updated Lead records will be assigned to your custom Region__c values based on the picklist values in the standard Country fields. If you wish to do a backfill of all your records, simply recreate the Flow as a scheduled Flow using Update Nodes instead of Assignment ones and run the same logic. You now have scalable, cross-object logic for segmenting records based off of iron-clad picklist values. If you want to change the region mapping in the future, simply edit the Custom Labels values, or add a new Custom Label as necessary.
Thanks for reading, and happy administering!
Want to talk about customizing your Salesforce org for a better experience? Get in touch! We’d love to chat.